Exporting with Exporter
You can select file formats to export as files in various formats.
You can also use exporters suitable for SNS or other upload destinations, to easily export files that suit the target.
Exporting in the Windows Media Video format.
1) Click [Export] on the Recorder.

2) Click [Print to File].
-
The [Print to File] dialog box appears.
 Alternative
-
Click [File] on the menu bar, and click [Export] → [Print to File].
-
Exporting to file: [F11]
3) Click [Windows Media] on the category tree.
-
A list of exporters is displayed in [Windows Media].
4) Click [WindowsMediaVideo], and click [Export].
-
The [WindowsMediaVideo] dialog box appears.
5) Configure the export settings.
6) Enter a file name, select the save destination and click [Save].
-
The rendering job will be registered to the Render Service. An indication appears on the PC screen to notify that rendering will be started.
Registered rendering jobs are processed in the background in a sequential order of the predetermined priority. The progress of the rendering process can be checked on GV Job Monitor.
-
If [Add to Bin] has been checked in the [Print to File] dialog box, a clip will be registered to the bin. The icon to indicate that the background job is in process is displayed on the clip, and the progress is indicated by a progress bar and percentage.
-
The color of the GV Job Monitor icon on the status bar turns to purple while a file export rendering job is being processed.
When the rendering process has been finished, an indication appears on the PC screen to notify that rendering has been finished. The color of the icon on the status bar returns to its original state.
-
Even if the project file is closed before the rendering process is completed, the process of the rendering job will be continued.

-
After step 3) , the procedure differs according to the selected exporter. Perform operations according to the on-screen instructions.
-
Clicking [OK] on the notification of start/finish of file export will display GV Job Monitor ([Job] window). Clicking [Close] will close the notification.
-
The notification for start/finish of file export will be indicated in accordance with the setting of the [Notification] checkbox in GV Job Monitor, as well as the Windows configuration.
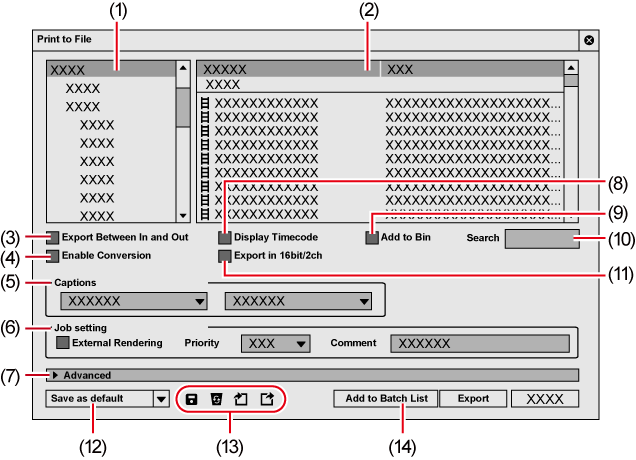
[Print to File] Dialog Box
|
(1) |
Category tree |
Select a category to narrow down the exporter options. [Current default] Display the default exporters. [Recently used] Display exporters in a list in the order of most recently used first. [My presets] Display the exporter presets registered by the user in a list. [Target] Display the list of exporters that can export files in the formats suitable for SNS or other upload destinations. [All] Display all exporters in a list. You can narrow the exporter options by selecting a category by format. |
|
(2) |
Exporter/Preset list |
Display the exporters within a selected category in a list. [Preset] Display exporter presets stored as default and exporter presets stored by the user. Exporting Exporter Presets (Export)
Indicates exporters to export a file that includes a video element.
Indicates exporters to export an audio element.
Check [Enable Conversion] to display all exporter presets including exporter presets with a format that differs from the project settings. Exporting in a Format that Differs from the Project Settings |
|
(3) |
[Export Between In and Out] |
Check this item to export only between In and Out points of the timeline. |
|
(4) |
[Enable Conversion] |
Check this item to enable conversion processing used to export in formats that differ from the project settings. Exporting in a Format that Differs from the Project Settings |
|
(5) |
[Captions] |
Select the export method of closed captions. Selectable items differ depending on the selected exporter.
|
|
(6) |
[Job setting] |
[External Rendering] Displayed only when the Chorus Hub system is used. Check this item to process file export rendering jobs with an external render engine. [Priority] Set [Priority] of file export rendering jobs. For [Priority], three stages of [High], [Normal] and [Low] can be set. [Comment] Enter a comment to be displayed in GV Job Monitor. The entered comment is displayed in [Comment] in the job list of GV Job Monitor. [Comment] of GV Job Monitor can be shown/hidden by setting [Columns] on GV Job Monitor. |
|
(7) |
[Advanced] |
Click the expand button to configure conversion processing when exporting in a format that differs from the project settings. |
|
(8) |
[Display Timecode] |
Check this item to export with a timecode shown on-screen. |
|
(9) |
[Add to Bin] |
Check this item to register the exported files to the bin. When the file export rendering job is registered to the Render Service, a clip will be registered to the bin. |
|
(10) |
[Search] |
Search the exporters. |
|
(11) |
[Export in 16bit/2ch] |
Check this item to perform export in 16 -bit/2ch regardless of the audio format of the project settings or selected exporter preset. It is convenient to leave it checked when a multi-channel project is to be exported and used with software by another manufacturer. |
|
(12) |
[Save as default] |
Save four items for [Current default]. Registering Exporter Configuration as Default Exporter The saved exporters are displayed in [Current default] of the category tree. Also, clicking [Export] on the Recorder and selecting [Print to File (Default Exporter)]/[Add to Batch Export (Default Exporter)] → default exporter to use can select the saved default exporter easily. |
|
(13) |
Preset operation buttons |
Register the exporter selected in the exporter/preset list together with the conversion processing configured under [Advanced] as an exporter preset.
Delete the exporter preset selected in the exporter/preset list.
Import exporter presets. Importing Exporter Presets (Import)
Export the exporter preset selected in the exporter/preset list. |
|
(14) |
[Add to Batch List] |
Add the specified range to the batch list. |
 : Video exporter
 : Audio exporter
 : A preset where conversion is performed
 : [Save preset]
 : [Delete preset]
 : [Import preset]
 : [Export preset]
-
To export a multi-channel project to use with software by another manufacturer, either check [Export in 16bit/2ch] or select an exporter in 16 -bit/2ch audio format.
[WindowsMediaVideo] Dialog Box
|
[Video settings] |
[Mode] [CBR] is a fixed transfer mode. It encodes with a constant bitrate regardless of movement or image complexity. Enter a value for [Bitrate]. [CBR (2-pass)] performs encoding after an analysis for movement and image complexity. [VBR (quality based)] is a variable transfer mode of direct conversion. The allotted bitrate is varied according to movement and image complexity. Enter a value for [Quality]. [VBR (2-pass)] is a variable transfer mode. The allotted bitrate is varied after an analysis of movement and image complexity. Enter the average bitrate in [Bitrate], and maximum bitrate in [Max]. [Frame rate] Check this item to change the frame rate (1-60 fps). To set to 29.97 fps, enter “2997”. [Picture size] The image size can be set by selecting from the list. Checking [Square pixel] sets the image aspect ratio at 1:1. Check this if the video is made vertically long or horizontally long by the playback device. [Quality setting] Move the slider depending on the relative importance of [frame rate (0)] (prioritizes smooth movement) and [image quality (100)]. |
|
[Audio settings] |
[Mode] [CBR] is a fixed transfer mode. It encodes with a constant bitrate regardless of audio complexity. Select a bitrate from the [Bitrate] list. [CBR (2-pass)] performs encoding after an analysis for audio complexity. [VBR (quality based)] is a variable transfer mode. The allotted bitrate is varied according to audio complexity. Select an average bitrate from the [Quality] list. |
Exporting in a Format that Differs from the Project Settings
You can use an exporter to export to file in a format that differs from the project settings.
1) Click [Export] on the Recorder.
2) Click [Print to File].
-
The [Print to File] dialog box appears.
Alternative
-
Click [File] on the menu bar, and click [Export] → [Print to File].
-
Exporting to file: [F11]
3) Click a category in the category tree, and check [Enable Conversion].
-
All exporters and exporter presets where the export format differs from the project settings are displayed. Exporter presets where conversion processing is to be performed will have a “ → ” symbol on their icon.
4) Select an exporter, and click the expand button in [Advanced].
-
Exporter presets stored as default can also be selected.
-
The [Print to File] (Detailed Settings) dialog box appears.
5) Set the details of the format to be exported.
-
Clicking [Save as default] saves the current settings. Clicking [Export] on the Recorder and selecting [Print to File (Default Exporter)] → default exporter to use can select the exporter easily.
-
You can save the current settings as a preset.
6) Click [Export], and configure according to the on-screen instructions.
7) Enter a file name, select the save destination and click [Save].
-
The rendering job will be registered to the Render Service. An indication appears on the PC screen to notify that rendering will be started.
Registered rendering jobs are processed in the background in a sequential order of the predetermined priority. The progress of the rendering process can be checked on GV Job Monitor.
-
If [Add to Bin] has been checked in the [Print to File] dialog box, a clip will be registered to the bin. The icon to indicate that the background job is in process is displayed on the clip, and the progress is indicated by a progress bar and percentage.
-
The color of the GV Job Monitor icon on the status bar turns to purple while a file export rendering job is being processed.
When the rendering process has been finished, an indication appears on the PC screen to notify that rendering has been finished. The color of the icon on the status bar returns to its original state.
-
Even if the project file is closed before the rendering process is completed, the process of the rendering job will be continued.
-
After step 6) , the procedure differs according to the selected exporter. Perform operations according to the on-screen instructions.
-
Clicking [OK] on the notification of start/finish of file export will display GV Job Monitor ([Job] window). Clicking [Close] will close the notification.
-
The notification for start/finish of file export will be indicated in accordance with the setting of the [Notification] checkbox in GV Job Monitor, as well as the Windows configuration.
[Print to File] (Detailed Settings) Dialog Box
If an exporter preset was selected in step 4) , you will switch to the export format settings of that exporter preset.
Setting [Change Video Format]
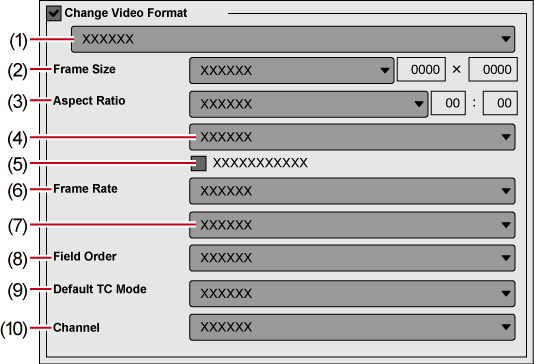
Checking [Change Video Format] exports files converting to the video format set in the following items.
“*” in the right field of a setting indicates that the setting agrees with the project settings.
|
(1) |
Video profile list |
Display a list of commonly used video formats. When you select a video format from the list, [Frame Size] and other items will switch to the selected video format settings. |
|
(2) |
[Frame Size] |
Select a frame size from the list. Select [Custom] to enter a setting value in pixels. |
|
(3) |
[Aspect Ratio] |
Select an aspect ratio from the list. If you select [Custom Display Aspect] or [Custom Pixel Aspect Ratio], you can set the aspect ratio by entering values. If you have set a customized aspect ratio, make sure to select a conversion method from the aspect ratio conversion setting. |
|
(4) |
Aspect ratio conversion settings |
If the aspect ratio set in [Aspect Ratio] differs from the project settings, select which method to use to convert the aspect ratio from the list. |
|
(5) |
[Crop Overscan Area] |
Check this item to convert the aspect ratio after cropping with the overscan size. The overscan size differs according to the project settings. |
|
(6) |
[Frame Rate] |
Select a frame rate from the list. If you have set a customized frame rate, be sure to select a conversion method in the frame rate conversion settings. |
|
(7) |
Frame rate conversion settings |
If the frame rate set in [Frame Rate] differs from the project settings, select from the list which conversion to perform. If you select [Frame blending], supplemental frames will be interpolated by combining the frame before and after each supplemental frame. If you select [Nearest frame], the nearest frame will be used to make supplementary frames. |
|
(8) |
[Field Order] |
Select a field order from the list. If you select [Auto], the optimum perceived field order will be selected automatically. |
|
(9) |
[Default TC Mode] |
Select whether the video to be exported displays the drop frame timecode or the non drop frame timecode as default. |
|
(10) |
[Channel] |
This can be set when an exporter to which the alpha channel is retained and can be output to is selected. Select whether to output only the color channel or to output the color channel and the alpha channel. |
Setting [Change Audio Format]
Checking [Change Audio Format] changes the audio format so it is exported with the below-described items. However, if [Export in 16bit/2ch] has been checked, the [Channels] and [Bit Depth] settings will be fixed.
“*” in the right field of a setting indicates that the setting agrees with the project settings.
|
[Channels] |
Select the number of channels from the list. If the selected number of channels is fewer than the project setting, the channels will be exported in order from 1ch. Select [2ch] to export a multi-channel project to be used with software of another company. |
|
[Sampling Rate] |
Select a sampling rate from the list. |
|
[Bit Depth] |
Select an audio quantization bitrate from the list. Select [16bit] to export a multi-channel project to be used with software of another company. |
|
[Export Audio] |
Check this item to export the audio part. |
|
[Create Waveform Cache] |
Check this item to create waveform cache (waveform representation of audio). |
[Remove Ancillary data] setting
This can be set when a compatible exporter is selected. Check this item to export with ancillary data removed. This setting does not affect the export of closed captions.
|
|
|---|
|

[Remove Audio Bitstream] setting
This can be set when a compatible exporter is selected. Check this item to export with the audio bitstream removed.
|
|
|---|
|
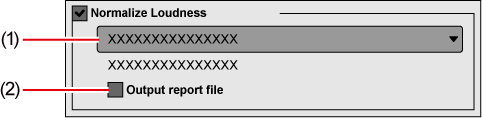
[Normalize Loudness] setting
Checking this item enables to measure the loudness and perform normalization at the same time when you export a project file.
For normalization, the volume of the entire project can be adjusted according to a predefined loudness reference value.
|
(1) |
Loudness reference value |
Select the preset to use as the reference for loudness measurement and normalization. |
|
(2) |
[Output report file] |
Check this item to export the loudness adjustment details and measurement result values of the sequence to a text file. The text file will be saved in the same location as the exported project file. If project files are to be exported to FTP or some other destinations, they will be saved in the “Log” folder in the project folder. |
-
Clicking [Save preset] in the [Print to File] dialog box will create an exporter preset that contains the setting details of [Normalize Loudness].
|
|
|---|
|
Setting the Aspect Ratio Conversion
For the items in the list of the aspect ratio conversion setting to be set in the [Print to File] (Detailed Settings) dialog box, what follows are example descriptions of converting a 16:9 screen to a 4:3 screen, and a 4:3 screen to a 16:9 screen.
|
Item |
Original screen → Converted screen |
Description |
|---|---|---|
|
Letter box / Side panel |
16:9 → 4:3 |
The 16:9 screen is displayed in the center of a 4:3 screen, and a letter box effect is added above and below. 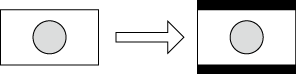 |
|
4:3 → 16:9 |
The 4:3 screen is displayed in the center of a 16:9 screen, and side panels are added at the edges.  |
|
|
Side cut / Crop top and bottom |
16:9 → 4:3 |
The left and right sides of the 16:9 screen are cropped to fit the 16:9 screen to a 4:3 screen size.  |
|
4:3 → 16:9 |
The top and bottom parts of the 4:3 screen are cropped to fit the 4:3 screen to a 16:9 screen size.  |
|
|
Anamorphic |
16:9 → 4:3 |
The 16:9 screen is compressed horizontally to fit a 4:3 screen size. The frame aspect ratio is not conserved.  |
|
4:3 → 16:9 |
The 4:3 screen is stretched horizontally to fit a 16:9 screen size. The frame aspect ratio is not conserved.  |
|
|
Semi-letter box (14:9/13:9) |
16:9 → 4:3 |
The 16:9 screen is cropped to a 14:9 or 13:9 screen size, displayed in the center of a 4:3 screen and a letter box effect is added above and below.  |
|
4:3 → 16:9 |
The 4:3 screen is cropped to a 14:9 or 13:9 screen size, displayed in the center of a 16:9 screen and side panels are added at the edges.  |
AVI Format
The compression format can be selected to export a project as an AVI file.
1) Click a codec of [AVI] in the category tree of the [Print to File] dialog box.
2) Select an exporter, and click [Export].
-
For the items for the Grass Valley HQ AVI and Grass Valley HQX AVI codec settings, see the description given for the [Settings - Grass Valley HQ]/[Settings - Grass Valley HQX] dialog box in [System Settings].
[Settings - Grass Valley HQ]/[Settings - Grass Valley HQX] Dialog Box
-
If [Use MSDV codec] is checked when the [DV AVI] exporter has been selected, it will export as AVI with the MSDV codec.
3) Set a file name and save destination, and click [Save].
Audio Format
You can export just the audio of a project.
-
For details on [Dolby Digital Professional (AC-3)] exporter and [Dolby Digital Plus (E-AC-3)] exporter, see Dolby Digital Professional or Dolby Digital Plus Format .
1) Click [Audio] in the category tree of the [Print to File] dialog box.
-
To export as Windows Media Audio, click [Windows Media] in the category tree.
2) Select an exporter, and click [Export].
3) Set a file name and save destination, and click [Save].
-
If the [WindowsMediaAudio] exporter has been selected, select the transfer mode. If [CBR] (fixed transfer mode) has been selected, select a bitrate from the [Bitrate] list. If [VBR (quality based)] (variable transfer mode) has been selected, select a bitrate from the [Quality] list.
-
If the [MPEG-1/2 Audio Layer-3 (MP3)] exporter has been selected, select a transfer mode between [CBR] (fixed transfer mode) and [VBR] (variable transfer mode), and select a bitrate from the [Bitrate] list.
Dolby Digital Professional or Dolby Digital Plus Format
Projects can be exported as Dolby Digital Professional or Dolby Digital Plus format files.
-
On EDIUS Broadcast, [Dolby Digital Professional (AC-3)] exporter can be used instead of [Dolby Digital (AC-3)] exporter. As Dolby Digital Professional (AC-3) is compatible with Dolby Digital (AC-3), saved presets can be used as they are.
1) Click [Audio] in the category tree of the [Print to File] dialog box.
2) Select [Dolby Digital Professional (AC-3)] or [Dolby Digital Plus (E-AC-3)], and click [Export].
|
[Format] |
Select the number of bits. |
|
[Setting] |
Set bitstream details. |
3) Set a file name and save destination, and click [Save].
Assigning output channels
Output channels are assigned to the front left (L), front right (R), front center (C), LFE, rear left (Ls), and rear right (Rs), in the order from the smallest channel number. (Channels that are not used will be skipped.) When the single rear (S) is to be used, the rear left (Ls) is assigned.
Output channel can be set in the channel map of the project setting or sequence setting.
When [Audio Coding Mode] in the [Dolby Setting] dialog box is set to [2/0]
Audio set as Ch1 in the sequence settings is encoded as L, and audio set as Ch2 is encoded as R.
|
[Audio Coding Mode] |
[LFE Channel] *1 |
Stream to be assigned |
||||||
|---|---|---|---|---|---|---|---|---|
|
L |
R |
C |
LFE |
Ls |
Rs |
S |
||
|
[1/0] |
― |
― |
― |
Ch1 |
― |
― |
― |
― |
|
[2/0] |
― |
Ch1 |
Ch2 |
― |
― |
― |
― |
― |
|
[2/1] |
― |
Ch1 |
Ch2 |
― |
― |
― |
― |
Ch3 |
|
|
Ch1 |
Ch2 |
― |
Ch3 |
― |
― |
Ch4 |
|
|
[2/2] |
― |
Ch1 |
Ch2 |
― |
― |
Ch3 |
Ch4 |
― |
|
|
Ch1 |
Ch2 |
― |
Ch3 |
Ch4 |
Ch5 |
― |
|
|
[3/0] |
― |
Ch1 |
Ch2 |
Ch3 |
― |
― |
― |
― |
|
|
Ch1 |
Ch2 |
Ch3 |
Ch4 |
― |
― |
― |
|
|
[3/1] |
― |
Ch1 |
Ch2 |
Ch3 |
― |
― |
― |
Ch4 |
|
|
Ch1 |
Ch2 |
Ch3 |
Ch4 |
― |
― |
Ch5 |
|
|
[3/2] |
― |
Ch1 |
Ch2 |
Ch3 |
― |
Ch4 |
Ch5 |
― |
|
|
Ch1 |
Ch2 |
Ch3 |
Ch4 |
Ch5 |
Ch6 |
― |
|
*1
 indicates that [LFE Channel] in the [Dolby Setting] dialog box is checked.
[Dolby Setting] Dialog Box
|
[Audio Coding Mode] |
Specify the audio channel (front left (L), front center (C), front right (R), single rear (S) rear left (Ls), rear right (Rs)). Select an option from [1/0] (C only, monaural), [2/0] (L/R, stereo), [2/1] (L/R/S), [2/2] (L/R/Ls/Rs), [3/0] (L/C/R), [3/1] (L/C/R/S), [3/2] (L/C/R/Ls/Rs). The items where the number of channels exceeds the audio channels in the project setting cannot be selected. |
|
[LFE Channel] |
Check this item to export including LFE channel. When [Audio Coding Mode] is set to [1/0] or [2/0], it cannot be selected. |
|
[Dolby Surround Mode]/[Dolby Surround Mode EX] *1 |
Set Dolby surround or Dolby Digital surround EX. When [Audio Coding Mode] is set to [1/0] or [2/1], it cannot be selected. |
|
[Stereo Downmix Preference] |
Can be set when [Audio Coding Mode] is set to [3/0], [3/1], or [3/2]. [Not indicated] Dolby surround mode is not specified. [Lt, Rt] Downmix to audio compatible with Dolby surround. [Lo, Ro] Downmix to audio compatible with stereo or monaural playback. [Pro Logic II] Downmix in the Dolby Digital Pro Logic II format. For Dolby Digital Professional, it cannot be set. |
|
[Center Mix Level] |
Can be set when [Audio Coding Mode] is set to [3/0], [3/1], or [3/2]. Select a value to downmix the center channel when the playback device does not have the center channel and stereo playback is to be performed. Selecting [-INF dB] deletes the center channel. |
|
[Surround Mix Level] |
Can be set when [Audio Coding Mode] is set to [2/1], [2/2], [3/1], or [3/2]. Select a value to downmix the surround channel when the playback device does not have the surround channel and stereo playback is to be performed. Selecting [-INF dB] deletes the surround channel. |
|
[Peak mixing level] |
Specify the peak sound pressure level (SPL) in the environment where the final mixing has been performed (such as a studio or dubbing stage). Select from [111 dB] to [80 dB]. |
|
[Dialog Normalization] |
Specify the average audio level of the bitstream. Specifying this value enables playback of multiple audio with the same level on the playback device. Select from [-31 dB] to [-1 dB]. The difference between the selected value and 31 dB is the attenuation when the audio is played back on a playback device. Select the audio level [-31 dB] from the edited file. Example: For audio of average - 6 dB Set [-6 dB]. The attenuation will be 31 dB – 6 dB = 25 dB. Example: For audio of average - 12 dB Set [-12 dB]. The attenuation will be 31 dB – 12 dB = 19 dB. |
|
[Bitstream Mode] |
Set the audio service included in the bitstream. |
|
[Room type] |
Specify the information on the environment where the final mixing has been performed (such as a studio or dubbing stage). |
|
[Dynamic range control profile] |
Specify the dynamic range compression settings. To use [Dynamic range control profile], configure [Dialog Normalization] properly. |
|
[A/D converter type] |
Specify the digital conversion process. |
|
[LFE lowpass filter] |
Check this item to enable the low-pass filter of the LFE channel and to filter audio of 120 Hz or higher. |
|
[90-degree phase shift] |
Check this item to output in Dolby surround compatible audio when downmix playback of multi-channel audio is performed on a 2-channel decoder. |
|
[3 db attenuation] |
Check this item to decrease the surround channel by 3 dB when home theater equipment compatible with multi-channel is used. |
|
[Copyright Flag] |
Check this item to specify that the output file contains copyright-protected contents. |
|
[Original Flag] |
Check this item to specify that the output file is not a copy but an original file. |
*1 If [2/0] is specified for [Audio Coding Mode], [Dolby Surround Mode] is set. If [2/2], [3/0], [3/1], or [3/2] is specified, [Dolby Surround Mode EX] is set.
QuickTime Format
You can export a project in MOV format that can be played back as a QuickTime movie.
-
If one of the following exporters is used for export when [Color Space] in [Project Settings] is set to [BT.2020/BT.2100 HLG] or [BT.2020/BT.2100 PQ], HDR metadata will be added at the time of export.
-
[Grass Valley HQX MOV]
-
[Grass Valley HQ MOV]
-
[H.264/AVC MOV]
-
[H.264/AVC MOV (NVIDIA)]
-
[H.265/HEVC MOV]
-
[H.265/HEVC MOV (NVIDIA)]
-
[ProRes MOV]
-
[ProRes 4444 MOV]
-
[DNxHD MOV]
-
[DNxHR MOV]
-
[DNxHR 444 MOV]
-
1) Click [QuickTime] in the category tree of the [Print to File] dialog box.
2) Select an exporter, and click [Export].
3) Select a file format from the [Save as type] list, and configure the detailed settings.
-
If the exporter is [ProRes MOV], set the codec in [ProRes CODEC settings].
Select an item from [ProRes 422 HQ], [ProRes 422], [ProRes 422 LT] and [ProRes 422 Proxy].
-
If the exporter is [ProRes 4444 MOV], set the codec in [ProRes CODEC settings].
There is only one setting item, [ProRes 4444].
-
If the exporter is [JPEG2000 MOV] or [QT Animation MOV], set [Video] and [Audio]. [Quality] for video and [Codec] for audio can be set.
-
For the detailed items when [H.264/AVC MOV] and [H.265/HEVC MOV] are set for the exporter, see the descriptions given for the [Basic Settings] tab/[Extended Settings] tab in MP4 Format .
-
If the exporter is [DNxHD MOV], set [Bitrate].
-
If the exporter is [DNxHR MOV] or [DNxHR 444 MOV], set [Format] and [VBR].
4) Configure the export settings, enter a file name and click [Save].
-
For the items for the Grass Valley HQ and Grass Valley HQX codec settings, see the description given for the [Settings - Grass Valley HQ]/[Settings - Grass Valley HQX] dialog box in [System Settings].
[Settings - Grass Valley HQ]/[Settings - Grass Valley HQX] Dialog Box
-
See the QuickTime player help for more information on the detailed settings for each file export.
BD Format
You can export to an MPEG 2 format file (*.m2ts) for BD.
1) Click [H.264/AVC] in the category tree of the [Print to File] dialog box.
2) Click [Blu-ray], and click [Export].
-
The [Blu-ray] dialog box appears.
3) After setting the export details, specify a file name and save destination and click [Save].
[Blu-ray] Dialog Box
[Basic Settings] tab
|
[Video settings] |
[Profile] Set the profile. The selectable profiles will differ dependent on the frame size to be exported. [Bit Rate Type] [CBR] assigns a constant number of bits. Although noise, etc. may be present, the encoding process is made quicker. [VBR] changes the assigned bitrate according to the complexity of the movement or image quality. Compared with [CBR], the media volume can be used more efficiently, and this enables more consistent image quality overall. [Average] Set this item if [CBR] or [VBR] has been selected as the bitrate type. You can either select from the list or enter values directly. [Max] Set this item if [VBR] has been selected as the bitrate type. You can either select from the list or enter values directly. [Quality] Select the image quality from the list. [Use Hardware Encoder] Check this item to output video using hardware encoding with Quick Sync Video. Unchecking this item will output video using H.264 software encoder that enables high-quality and high-speed encoding. In an environment where hardware encoding is not available, [Use Hardware Encoder] will not be displayed. The encoder for output will be fixed to H.264 software encoder. |
|
[Audio settings] |
[Format] Select the audio compression format from the list.
[Bit Rate] Select a bitrate from the list. |
[Extended Settings] tab
|
[GOP Structure] |
Select the GOP structure. |
|
[Picture Count] |
Set the GOP length. |
|
[Number of Reference Frames] |
Set up to how many frames to consider when motion estimation is performed. |
|
[Multi Slice] |
Check this item to divide 1 frame into 4 parts. If the decoder supports multi-slicing, the decoding may be made quicker. |
|
[Entropy Coding Mode] |
Select the H.264 encoding mode. |
|
[Bit Depth] |
Video quantization bitrate is fixed at [8]. |
|
[Chroma Format] |
Pixel format of YUV is fixed at [4:2:0]. |
MP4 Format
Projects can be exported in MP4 format files (*.mp4).
-
If [Bit Depth] is set to [10] in the [Extended Settings] tab at the time of export, the file will be exported in 10 -bit.
-
If one of the following exporters is used for export when [Color Space] in [Project Settings] is set to [BT.2020/BT.2100 HLG] or [BT.2020/BT.2100 PQ], HDR metadata will be added at the time of export.
-
[H.264/AVC]
-
[H.264/AVC (NVIDIA)]
-
[H.265/HEVC]
-
[H.265/HEVC (NVIDIA)]
-
-
Export in H.265/HEVC is available by using Quick Sync Video. The [H.265/HEVC] exporter can be used only on an environment equipped with Intel Core i series CPU (6th generation or later).
Note that the 6th generation CPUs do not support export of project in 4:2:0 10 -bit.
If Quick Sync Video is not equipped, encoding will be performed with software.
-
Export in H.264/AVC or H.265/HEVC is available by using a graphics board manufactured by NVIDIA. The exporters for [H.264/AVC (NVIDIA)] and [H.265/HEVC (NVIDIA)] can be used only on an environment equipped with a graphics board manufactured by NVIDIA.
For the supported graphics boards, visit our website.
-
The [H.264/AVC (NVIDIA)] exporter does not support export of interlaced files and files with a bit depth of 10 -bit.
1) Click [H.264/AVC] or [H.265/HEVC] in the category tree of the [Print to File] dialog box.
2) Select an exporter, and click [Export].
-
Select one of the following exporters.
-
[H.264/AVC]
-
[H.264/AVC (NVIDIA)]
-
[PlayStation Portable]
-
[iPod]
-
[H.265/HEVC]
-
[H.265/HEVC (NVIDIA)]
-
3) After setting the export details, specify a file name and save destination and click [Save].
Export Settings Dialog Box in MP4 Format
The setting items will differ depending on the exporter.
[Basic Settings] tab
|
[Video settings] |
[Profile] Set the profile. The selectable profiles will differ depending on the frame size to be exported. [Bit Rate Type] [CBR] assigns a constant number of bits. Although noise, etc. may be present, the encoding process is made quicker. If the exporter is [H.265/HEVC (NVIDIA)] or [H.265/HEVC MOV (NVIDIA)] for [QuickTime], you cannot select [CBR]. [VBR] changes the assigned bitrate according to the complexity of the movement or image quality. Compared with [CBR], the media volume can be used more efficiently, and this enables more consistent image quality overall. [Average] Set this item if [CBR] or [VBR] has been selected as the bitrate type. You can either select from the list or enter values directly. [Max] Set this item if [VBR] has been selected as the bitrate type. You can either select from the list or enter values directly. [Quality] Select the image quality from the list. [Use Hardware Encoder] Check this item to output video using hardware encoding with Quick Sync Video. Unchecking this item will output video using the H.264/H.265 software encoder that enables high-quality and high-speed encoding. In an environment where hardware encoding is not available, [Use Hardware Encoder] will not be displayed. The encoder for output will be fixed at H.264 software encoder. If the [H.264/AVC (NVIDIA)] or [H.265/HEVC (NVIDIA)] exporter has been selected and you check [Use Hardware Encoder] to output video in an environment where software encoding is not available, the job will result in an error. |
|
[Audio settings] |
[Format] *1 The audio compression format will be fixed at [AAC]. [Bit Rate] Select a bitrate from the list. |
*1 If the exporter is [H.264/AVC MOV] or [H.265/HEVC MOV] for [QuickTime], you can also select [Linear PCM].
[Extended Settings] tab
|
[GOP Structure] |
Select the GOP structure. |
|
[Picture Count] |
Set the GOP length. |
|
[Number of Reference Frames] |
Set the maximum number of frames to be taken into consideration in motion estimation. |
|
[Multi Slice] |
Check this item to divide 1 frame into 4 parts. If the decoder supports multi-slicing, the decoding may be made quicker. |
|
[Entropy Coding Mode] |
Select the H.264 encoding mode. |
|
[Adjust bitrate by pixels per sec] |
Check this item to adjust the bitrate in accordance with the number of pixels per second. |
|
[Bit Depth] |
Select a video quantization bitrate from the list. |
|
[Chroma Format] |
Select a YUV pixel format from the list. |
|
[MP4 Option] |
Select [Fast Start] to add moov at the start of the file, set it as Fast Start, and export it. Select [Fragmented] to export the file in Fragmented MP4 format. If you do not use [Fast Start] and [Fragmented], select [None]. |
|
[Audio Option] *1 |
Select [Multi Channels] to output the channels as center, right or left. Select [Multi Tracks] to output multiple streams of 2ch channel. When 6 or more channels are output, all channels can be output using this option. If you check [Apply bitrate per track], the [Bit Rate] setting made for [Audio settings] in the [Basic Settings] tab will be applied to each track. This setting is enabled only when [Multi Tracks] has been selected. |
*1 Available only when [Format] of [Audio settings] in the [Basic Settings] tab is set to [AAC].
|
|
|---|
|
Uploading HDR video to YouTube
This section describes how to export files recognized as HDR video on YouTube.
-
The following procedure shows an example.
1) Create a project.
-
Create a project with the following project settings.
-
[Video Preset]: [QFHD 3840 x 2160 59.94p]
-
[Video Bit Depth]: [10bit]
-
[Color Space]: [BT.2020/BT.2100 PQ]
-
2) Register a clip in the Log format to the project, and place the clip on the timeline.
3) Apply [Primary Color Correction] to the clip.
-
If the clip is not recognized as Log file, set the color space manually.
-
Performing color grading in the [Primary Color Correction] dialog box, if necessary.
4) Click [Print to File].
5) Click [H.264/AVC] or [H.265/HEVC] in the category tree of the [Print to File] dialog box.
6) Select [H.264/AVC MP4 3840x2160 59.94p 10bit] or [H.265/HEVC MP4 3840x2160 59.94p 10bit] from [Preset] of exporter.
7) Click [Export] and specify the file name and save destination, and click [Save].
-
When the exported file is uploaded to YouTube, the file is recognized as HDR video. For details, visit the website of YouTube.
MPEG-2 Format
Projects can be exported as an MPEG-2 format file.
1) Click [MPEG] in the category tree of the [Print to File] dialog box.
2) Click [MPEG2 Program Stream], and click [Export].
-
The [MPEG2 Program Stream] dialog box appears.
3) Configure the video and audio settings, specify a file name and save destination and click [Save].
[MPEG2 Program Stream] Dialog Box
[Basic Settings] tab
The setting items displayed may differ in part depending on the exporter.
|
[Video settings] |
[Segment Encode] Check this item to export a clip of a raw source without re-encoding. This increases the output speed. [Size] Select an image quality. [Quality/Speed] Select quality from the list. The higher the quality, the more time it takes to be encoded. [Bit Rate] Select a bitrate type. [CBR] sets a fixed transfer rate, allocating a fixed number of bits during the encoding process. Select a bitrate from the [Average(bps)] list. You can also enter a value directly. [VBR] sets a variable transfer rate, altering the number of assigned bits according to the complexity of the movement or image quality. Compared with [CBR], the media volume can be used more efficiently, and this enables more consistent image quality overall. Select a bitrate from the [Average(bps)] and [Maximum(bps)] lists. You can also enter a value directly. |
|
[Audio settings] |
[Format] Select the audio compression format from the list. [Channel] Select from [Stereo], [Dual Channel] or [Joint Stereo]. [Stereo] is normal stereo that records separately on the left and right sides. If there is a large difference between the left and right audio, compared to stereo that saves audio with a greater focus on one side, [Dual Channel] records totally independently so that there is no bias in sound quality to one side. Select to enter narration in 2 languages, etc. [Joint Stereo] improves audio quality and compression ratio when recording left and right audio separately by automatically using a single channel that combines the audio when the left and right sides are the same or one more channel when the left and right audio are different. [Bit Rate] Select a bitrate from the list. |
[Extended Settings] tab
|
[Video settings] |
[Field Order] For interlace, a field order can be selected. [Chroma Format] Select a YUV pixel format from the list. [Profile & Level] Select a profile & level. If [Chroma Format] is [4:2:0] and [4:2:2], the profile will be set to Main Profile and 422Profile, respectively. The level for SD image quality will be Main Level, and the level for HD image quality will be High Level. The profile & level changes according to the format selected in [Chroma Format]. [GOP Structure] For MPEG, a certain number of frames is considered as a group, and operations such as compression/enlargement and cut editing are performed on a GOP basis. A GOP comprises “I frame”, “P frame” and “B frame”. The I frame allows images to be reproduced independently, the P frame is for recording and reproducing only the differences with the preceding image, and the B frame reproduces images from the differences in the preceding and following images. Select I, P and B frame patterns of the GOP from the list. Normally, select [IBBP]. [I-Frame Only] is comprised of only I-pictures. Editing is made easier, but the amount of data increases in size. [Picture count] Set the number of frames included in a group. [Closed GOP] Check this item to complete information within each GOP. Although the amount of data increases, the video can be re-edited using software that supports GOP-based editing. Normally, leave this item unchecked. |
|
[Audio settings] |
[Emphasis] Select from the list for high-frequency compensation that saves while emphasizing the high range. With [None], there is no high-frequency compensation. [50/15 us] is an emphasis setting employed by some audio CDs, etc. [CCITT J.17] is a telecommunications standard recommended by CCITT. [Protection] The “protection_bit” indicates whether redundancy is added to an audio stream in order to make error detection and correction possible. Check this item to change it to “1”, indicating that redundancy is being added. Uncheck this item to change it to “0”, indicating that redundancy is not being added. [Original Flag] Check this item to change the “original_copy” bit to “1”, indicating the original copy. If it is unchecked, it becomes “0”, indicating a duplication. [Copyright Flag] Check this item to change the “copyright” bit to “1”, indicating that the copyright is protected. If it is unchecked, it becomes “0”, indicating there is no copyright. |
Still Image Format
You can export the timeline as still image files.
1) Click [Other] in the category tree of the [Print to File] dialog box.
2) Click [Still Image], and click [Export].
3) Specify a file name and export destination, and select the export format.
-
A sequential number will be added based on the file name entered.
|
[Advanced] |
Change the aspect ratio correction or export field settings. The settings for [Still Image] in [System Settings] will be the initial values. |
-
For example, if “Still1” is entered as the file name, the exported image files will become “Still1”/“Still2”/“Still3”... and if “Still5” is entered as the file name, the exported image files will become “Still5”/“Still6”/“Still7”..., etc. If a number is not added at the end of the file name, an 8-digit sequential number will be added automatically.
4) Click [Save].
-
The video is exported as still images.
Flash Video (F4V) Format
Projects can be exported in F4V format for Flash.
-
If [Color Space] is set to [BT.2020/BT.2100 HLG] or [BT.2020/BT.2100 PQ] in [Project Settings], HDR metadata will be added at the time of export.
1) Click [H.264/AVC] in the category tree of the [Print to File] dialog box.
2) Click [F4V], and click [Export].
-
The [F4V] dialog box appears.
3) After setting the export details, specify a file name and save destination and click [Save].
[F4V] Dialog Box
[Basic Settings] tab
|
[Video settings] |
[Profile] Set the profile. The selectable profiles will differ depending on the frame size to be exported. [Bit Rate Type] [CBR] assigns a constant number of bits. Although noise, etc. may be present, the encoding process is made quicker. [VBR] changes the assigned bitrate according to the complexity of the movement or image quality. Compared with [CBR], the media volume can be used more efficiently, and this enables more consistent image quality overall. [Average] Set this item if [CBR] or [VBR] has been selected as the bitrate type. You can either select from the list or enter values directly. [Max] Set this item if [VBR] has been selected as the bitrate type. You can either select from the list or enter values directly. [Quality] Select the image quality from the list. [Use Hardware Encoder] Check this item to output video using hardware encoding with Quick Sync Video. Unchecking this item will output video using H.264 software encoder that enables high-quality and high-speed encoding. In an environment where hardware encoding is not available, [Use Hardware Encoder] will not be displayed. The encoder for output will be fixed at H.264 software encoder. |
|
[Audio settings] |
[Format] The audio compression format will be fixed at [AAC]. [Bit Rate] Select a bitrate from the list. |
[Extended Settings] tab
|
[GOP Structure] |
Select the GOP structure. |
|
[Picture Count] |
Set the GOP length. |
|
[Number of Reference Frames] |
Set the maximum number of frames to be taken into consideration in motion estimation. |
|
[Multi Slice] |
Check this item to divide 1 frame into 4 parts. If the decoder supports multi-slicing, the decoding may be made quicker. |
|
[Entropy Coding Mode] |
Select the H.264 encoding mode. |
|
[Adjust bitrate by pixels per sec] |
Check this item to adjust the bitrate in accordance with the number of pixels per second. |
|
[Bit Depth] |
Video quantization bitrate is fixed at [8]. |
|
[Chroma Format] |
Pixel format of YUV is fixed at [4:2:0]. |
[Metadata] tab
|
[Export sequence marker as cue point] |
Check this item to export sequence markers as cue points for Flash. Select the name of the type of cue point. |
|
[Metadata] |
Export is possible with metadata appended. Select an item from the [Name] list, and enter metadata at [Value]. |
|
[Import] |
Import XMP format (*.xmp) metadata. This is reflected in the [Metadata] setting. |
|
[Export] |
Export the settings made at [Metadata] in XMP format. |
AVCHD Format
AVCHD streams can be easily exported to an SD memory card or memory stick. A file can be exported to any desired save destination.
If exporting to removable media, make sure to connect the SD memory card or memory stick to the PC before export.
-
If you want to edit a menu, etc. use Disc Burner to write the project to DVD or BD.
|
|
|---|
|
1) Click [AVCHD] in the category tree of the [Print to File] dialog box.
2) Select an exporter, and click [Export].
-
To write to removable media, click [AVCHD Writer], and proceed to step 3) .
-
To export to an AVCHD format file without writing to removable media, click [AVCHD], and proceed to step 5) .
|
|
|---|
|
3) Select [Drive] in [Destination].
-
The SD memory card or memory stick connected to the PC will be recognized as an external drive.
-
You can select [Folder] and click [Select] to export an AVCHD stream to a specific location on the PC.
4) Select [SD Memory Card] or [Memory Stick / HDD Camera] in [Format].
-
Select according to the media being used.
5) Configure each item in the [Basic Settings] tab and [Extended Settings] tab.
-
For the setting items, see the descriptions given for the [Basic Settings] tab/[Extended Settings] tab in BD Format .
6) Click [OK].
-
For [AVCHD], set a file name and save destination, and click [Save].
-
If a stream file size exceeds 2 GB, the file will be split up and exported.
XDCAM EX Format
Projects can be exported to an SxS memory card or an SDHC memory card in the XDCAM EX format.
Connect a device to the PC, and check the power is turned on.
Projects can also be exported as files to the storage on the PC.
|
|
|---|
|
1) Click [XDCAM] in the category tree of the [Print to File] dialog box.
2) Select an exporter, and click [Export].
-
Select either [XDCAM EX] or [XDCAM EX DV] as the exporter.
3) Set the export destination, quality, metadata, etc., and click [OK].
-
The setting items will differ depending on the exporter.
If [XDCAM EX] has been selected.
|
[Destination] |
Select whether to export to an SxS memory card, to export to an SDHC memory card, or to save to a local folder. A file is exported in a folder structure. If [Sony - SxS Memory Card] or [JVC - SDHC Memory Card] is selected, select a card from the list. If [Automatically select the next card when card is full.] is checked, when free space runs out on the SxS memory card selected as the export destination, an SxS memory card with free space will be selected automatically and exported to. If it is unchecked, a dialog box will be displayed to select the export destination. If [Folder] has been selected, click [...] and specify a save destination. |
|
[Segment Encode] |
Check this item to export a clip of a raw source without re-encoding. This increases the output speed. |
|
[ClosedGOP] |
Check this item to complete information within each GOP. Although the amount of data increases, the video can be re-edited using software that supports GOP-based editing. |
|
[Audio/Stereo] |
Check this item to export the audio as a stereo track. This is only displayed when the audio channel is 2ch. |
|
[Mode] |
Select an image quality mode (SP or HQ). |
|
[Quality/Speed] |
Select quality from the list. The higher the quality, the more time it takes to be encoded. |
|
Metadata |
Add metadata such as title and comments to clips to be exported. |
P2 Format
You can export a project to a P2 card.
Connect the P2 device to the PC, and check that the power is turned on.
Projects can also be exported as files to the storage on the PC.
-
If data is to be exported by the AVC-Intra or AVC-Ultra codec and [Color Space] is set to [BT.2020/BT.2100 HLG] or [BT.2020/BT.2100 PQ] in [Project Settings], HDR metadata will be added at the time of export.
|
|
|---|
|
1) Click [P2] in the category tree of the [Print to File] dialog box.
2) Select an exporter, and click [Export].
-
Select either [P2 Clip], [HD P2 Clip], or [AVCUltra P2 Clip] as the exporter. Exporters that do not support the project settings will not be displayed.
3) Set the export destination, user clip name, codec, etc., and click [OK].
-
The setting items will differ depending on the exporter.
-
Metadata, such as the created by and capture information, can be imported from another P2 clip. Click [Load Metadata] and select the XML file to be imported.
-
If there is no more free space in the export destination or if the clip consists of files with a size exceeding 4 GB in total, the clip will be split up and exported.
If [Automatically select the next card when card is full.] is checked, when the clip is split, a P2 card drive that has free space will be selected automatically and exported to. If it is unchecked, when the clip is split, a dialog box will appear to select the export destination.
-
If exporting at 720p, the export frames must be even frames. If a confirmation message appears, select a processing method.
-
If a DVCPRO HD export format and the settings content for an EDIUS project preset differ, the export data will be stretched before export so that the frame rate and the field order correspond to each other.
XDCAM Format
With the XDCAM exporter you can output a project as an MXF file, and upload it to an XDCAM device or FTP server.
Projects can also be exported as MXF files to the storage on the PC.
-
Files can also be exported to the XDCAM Memory drive (SxS memory card formatted with an XDCAM device).
-
To export to an FTP server, have the connection destination set in advance in system settings.
|
|
|---|
|
1) Click [XDCAM] in the category tree of the [Print to File] dialog box.
2) Select an exporter, and click [Export].
-
Select from [XDCAM DV], [XDCAM HD], [XDCAM HD 422], [XDCAM HD 720P] or [XDCAM MPEG IMX] for the project image size.
-
Exporters that do not support the project settings will not be displayed.
3) Set the export destination, clip name, etc., and click [OK].
-
The setting items will differ depending on the exporter.
If [XDCAM HD] has been selected.
|
[Destination] |
Select whether to export to an XDCAM drive, to an FTP server, or to the desired folder on the PC. A file is exported in a folder structure. If [XDCAM Drive] was selected, select a Drive from the list. If [FTP] was selected, check the server to be exported to and, as necessary, check the item described below. If [Folder] was selected, click [Select] and specify a save destination. [Upload to FTP after exporting file.] Check this item to export a temporary file to the project folder, and then upload the actual data to an FTP server. After outputting the temporary file, if an error occurs during transfer to the FTP server or if the upload is aborted, the temporary file will not be deleted. |
|
[Clip Name] |
Set the file name to be exported. [Auto (C****)] If it is checked, a file name will be set automatically. To set a preferred file name, remove the check from [Auto (C****)] and enter a name in [Clip Name]. (“Clip Naming” must be set as “Free” on the XDCAM drive.) |
|
[Segment Encode] |
Check this item to export a clip of a raw source without re-encoding. This increases the output speed. |
|
[Bit Rate] |
Select a bitrate from the list. |
|
[Quality/Speed] |
Select a quality. |
|
[ClosedGOP] |
Check this item not to use the B-picture at the GOP border as reference across GOPs. Although the amount of data increases, the video can be re-edited using software that supports GOP-based editing, as the information is completed within each GOP. |
|
[Audio Format] |
Select the audio format to export. |
-
If a clip is exported that does not include high-resolution or proxy data, a dialog box will appear to set the processing before export. Select a processing method and click [OK].
-
If [XDCAM MPEG IMX] was selected, 3 lines (black) will be added above and below the 720x480 video to be exported as Even (Top Field First).
Also, 720x576 (Odd) video will be shifted by 1 line to be exported as Even (Top Field First).
-
If uploading an MXF file to an FTP server that has once been exported to a folder on a PC, use the source browser. Click the XDCAM tree in the source browser, right-click the FTP connection destination and click [Upload]. Select an MXF file, and click [Open].
XAVC S Format
You can export a project to an XQD memory card in the XAVC S format.
Connect a device to the PC, and check that the power is turned on.
Projects can also be exported as files to the storage on the PC.
-
If [Color Space] is set to [BT.2020/BT.2100 HLG] or [BT.2020/BT.2100 PQ] in [Project Settings], HDR metadata will be added at the time of export.
|
|
|---|
|
1) Click [XAVC] in the category tree of the [Print to File] dialog box.
2) Click [XAVC S], and click [Export].
3) Set the export destination, clip name, etc., and click [OK].
|
[Destination] |
Select whether to export to an XAVC S device or to a desired PC folder. A file is exported in a folder structure. If [Memory Card] is selected, select a device from the list. If [Folder] is selected, click [...] and specify a save destination. |
|
[Video settings] |
[Bit Rate] Select a bitrate from the list. [Quality] Select an image quality. [Use Hardware Encoder] Check this item to output video using hardware encoding with Quick Sync Video. Unchecking this item will output video using H.264 software encoder that enables high-quality and high-speed encoding. In an environment where hardware encoding is not available, [Use Hardware Encoder] will not be displayed. The encoder for output will be fixed to H.264 software encoder. |
|
[Audio settings] |
Select the audio format of the video to be exported. |
|
Metadata |
Add metadata such as title and comments to clips to be exported. |
XAVC Format
With the XAVC exporter, you can export a project, and upload it to an XDCAM device or FTP server.
Projects can also be exported to the storage on the PC.
-
Files can also be exported to the XDCAM Memory drive (SxS memory card formatted with an XDCAM device).
-
To export to an FTP server, configure the setting of the connection destination in advance in system settings.
-
If [Color Space] is set to [BT.2020/BT.2100 HLG] or [BT.2020/BT.2100 PQ] in [Project Settings], HDR metadata will be added at the time of export.
|
|
|---|
|
1) Click [XAVC] in the category tree of the [Print to File] dialog box.
2) Click [XAVC], and click [Export].
3) Set the export destination, clip name, etc., and click [OK].
|
[Destination] |
Select whether to export to an XDCAM drive, to an FTP server, or to the desired folder on the PC. A file is exported in a folder structure. If [XDCAM Drive] was selected, select a drive from the list. If [FTP] was selected, check the server to be exported to and, as necessary, check the item described below. If [Folder] was selected, click [Select] and specify a save destination. [Upload to FTP after exporting file.] Check this item to export a temporary file to the project folder, and then upload the actual data to an FTP server. After exporting the temporary file, if an error occurs during transfer to the FTP server or if the upload is aborted, the temporary file will not be deleted. |
|
[Clip Name] |
Set the file name to be exported. [Auto (C****)] If it is checked, a file name will be set automatically. To set a preferred file name, remove the check from [Auto (C****)] and enter a name in [Clip Name]. (“Clip Naming” must be set as “Free” on the XDCAM drive.) |
|
[Format] |
Select the format to export. |
|
[Quality/Speed] |
Select quality and speed. |
|
[Audio Channels] |
Select the number of audio channels. |
K2 (CMF) or K2 (GXF) Format
You can export a project in the CMF or GXF format employed by K2.
-
To export to an FTP server, have the connection destination set in advance in system settings.
|
|
|---|
|
1) Click [K2] in the category tree of the [Print to File] dialog box.
2) Select an exporter, and click [Export].
-
The output settings dialog box appears. The setting items will differ depending on the exporter.
If [MPEG2 GXF] has been selected.
|
[Clip Name] |
Enter the name of the clip (file) to be exported. |
|
[Destination] |
Select whether to export to a desired PC folder or to an FTP server. If [Folder] was selected, click [Select] and specify a save destination. If [FTP] was selected, check the server to be exported to and, as necessary, check the items described below. [Overwrite file when it exists] Check this item to overwrite a file if the file with the same file name is present at the FTP server of the export destination. [Upload to FTP after exporting file] Check this item to export a temporary file to the project folder, and then upload the actual data to an FTP server. After outputting the temporary file, if an error occurs during transfer to the FTP server or if the upload is aborted, the temporary file will remain undeleted. [Do not add file extension when exporting to FTP] Check this item to export a file without adding the file extension to the name entered in [Clip Name]. (If [Clip Name] contains a file extension, export will take place with a clip file name with its file extension removed.) When this item is unchecked, export will take place with the “*.gxf” file extension added if the name entered in [Clip Name] does not include the file extension. |
|
[Keep the created file when aborting] |
Becomes enabled if [Upload to FTP after exporting file] is unchecked. If it is checked and export is aborted, the file created up to the time point of the abort will remain at the export destination. |
|
[Encode Settings] |
[Segment Encode] Check this item to export a clip of a raw source without re-encoding. This increases the output speed. [Bit Rate] Select a bitrate type. [CBR] sets a fixed transfer rate, allocating a fixed number of bits during the encoding process. Enter an average bitrate in [Average]. [VBR] sets a variable transfer rate, altering the number of assigned bits according to the complexity of the movement or image quality. Enter the average bitrate in [Average], and maximum bitrate in [Max]. [Quality/Speed] Select quality from the list. [Field Order] The field order can be selected if it is in SD format. [GOP structure] Select I, P and B frame patterns of the GOP from the list. Normally, select [IBBP]. [I-Frame Only] is comprised of only I-pictures. Editing is made easier, but the amount of data increases in size. [Picture count] Enter the number of frames included in 1 GOP. [Closed GOP] If it is checked, the GOP will be closed. Although the amount of data increases, the video can be re-edited using software that supports GOP-based editing, as the information is completed within each GOP. Normally, leave this item unchecked. [Chroma Format] Select a YUV pixel format from the list. [Profile/Level] Select a profile & level. If [Chroma Format] is [4:2:0] and [4:2:2], the profile will be set to Main Profile and 422Profile, respectively. The level for SD image quality will be Main Level, and the level for HD image quality will be High Level. The profile & level changes according to the format selected in [Chroma Format]. |
|
[Bit Rate] |
Select a bitrate from the list. |
|
[Audio settings] |
[Channels] Select the number of audio channels you want to export from the list. [Current setting] is the number of channels configured in the project settings. If [Enable Conversion] is checked for the exporter and the number of channels for the audio format is changed from the project settings, the number of channels will be the number set here. [Bit Depth] Select the number of bits to be used during sampling. [Current setting] is the number of bits configured in the project settings. |
3) Configure the export and click [OK].
MXF Format
You can export to MXF, a video file format used in industry for server transfer, etc.
-
To export to an FTP server, have the connection destination set in advance in system settings.
-
If one of the following exporters is used for export when [Color Space] in [Project Settings] is set to [BT.2020/BT.2100 HLG] or [BT.2020/BT.2100 PQ], HDR metadata will be added at the time of export.
-
[HQ MXF]
-
[HQX MXF]
-
[AVCIntra MXF]
-
[AVCUltra MXF]
-
[XAVC MXF]
-
[DNxHR MXF]
-
[DNxHR 444 MXF]
-
[ProRes MXF]
-
[ProRes 4444 MXF]
-
1) Click [MXF] in the category tree of the [Print to File] dialog box.
2) Select an exporter, and click [Export].
-
The output settings dialog box appears. The setting items will differ depending on the exporter.
If [MPEG2 MXF] has been selected.
|
[Clip Name] |
Enter the name of the clip (file) to be exported. |
|
[Destination] |
Select whether to export to a desired PC folder or to an FTP server. If [Folder] was selected, click [Select] and specify a save destination. Checking [Create the index file for simul edit.] will create an index file for editing while recording. Simultaneous editing from a separate terminal will be available while export is in process. If [FTP] was selected, check the server to be exported to and, as necessary, check the items described below. [Overwrite file when it exists] Check this item to overwrite a file if the file with the same file name is present at the server of the export destination. Uncheck this item to display a confirmation message. [Upload to FTP after exporting file] Check this item to export a temporary file to the project folder, and then upload the actual data to an FTP server. After outputting the temporary file, if an error occurs during transfer to the FTP server or if the upload is aborted, the temporary file will not be deleted. [Do not add file extension when exporting to FTP] Check this item to export a file without adding the file extension to the name entered in [Clip Name]. (If [Clip Name] contains a file extension, export will take place with a clip file name with its file extension removed.) Uncheck this item to export a file with the “*.mxf” added if the name entered in [Clip Name] does not include the file extension. |
|
[Keep the created file when aborting] |
Becomes enabled if [Upload to FTP after exporting file] is unchecked. When this item is checked, the file being uploaded will be completed if an upload is aborted. |
|
[Encode Settings] |
[Segment Encode] Check this item to export a clip of a raw source without re-encoding. This increases the output speed. [Bit Rate] Select a bitrate type. [CBR] sets a fixed transfer rate, allocating a fixed number of bits during the encoding process. Enter an average bitrate in [Average]. [VBR] sets a variable transfer rate, altering the number of assigned bits according to the complexity of the movement or image quality. Enter the average bitrate in [Average], and maximum bitrate in [Max]. [Quality/Speed] Select quality from the list. [Field Order] The field order can be selected if it is in SD format. [GOP structure] Select I, P and B frame patterns of the GOP from the list. Normally, select [IBBP]. [I-Frame Only] is comprised of only I-pictures. Editing is made easier, but the amount of data increases in size. [Picture count] Enter the number of frames included in 1 GOP. [Closed GOP] If it is checked, the GOP will be closed. Although the amount of data increases, the video can be re-edited using software that supports GOP-based editing, as the information is completed within each GOP. Normally, leave this item unchecked. [Chroma Format] Select a YUV pixel format from the list. [Profile/Level] Select a profile & level. If [Chroma Format] is [4:2:0] and [4:2:2], the profile will be set to Main Profile and 422Profile, respectively. The level for SD image quality will be Main Level, and the level for HD image quality will be High Level. The profile & level changes according to the format selected in [Chroma Format]. |
|
[Bit Rate] |
Select a bitrate from the list. |
|
[Audio settings] |
[Channels] Select the number of audio channels you want to export from the list. [Current setting] is the number of channels configured in the project settings. If [Enable Conversion] is checked for the exporter and the number of channels for the audio format is changed from the project settings, the number of channels will be the number set here. [Bit Depth] Select the number of bits to be used during sampling from the list. [Current setting] is the number of bits configured in the project settings. [Channels Per Track] Specify the number of channels to be included in 1 audio track for MXF. [Type] Select the audio format to export. |
|
[System Type] |
Select a system item format. |
|
[KAG Size] |
Select a KAG (KLV Alignment Grid) size. |
|
[MXF Profile] |
Export MXF files which have compatibility with third party systems. |
-
If the exporter is [ProRes MXF], set the codec in [Format].
Select an item from [ProRes 422 HQ], [ProRes 422], [ProRes 422 LT] and [ProRes 422 Proxy].
-
If the exporter is [ProRes 4444 MXF], set the codec in [Format]. There is only one setting item, [ProRes 4444].
-
If the exporter is [DNxHR 444 MXF], set the codec in [Format]. There is only one setting item, [444].
Checking [VBR] will change the bitrate to be assigned in accordance with the complexity of the movement or image quality.
3) Configure the export and click [OK].
AAF Format
You can export a project in an AAF file.
1) Click [Other] in the category tree of the [Print to File] dialog box.
2) Click [AAF Project Exporter], and click [Export].
3) Set a file name, export destination, and [Preset], and then click [Save].
-
If you want to check the preset settings or change export settings, click [Detail].
Exporting Closed Caption
Exporting a Project Containing Closed Caption Data
You can export a project that contains closed caption to a file.
A sidecar file (closed caption file) can be exported besides an output file, or closed caption data can be embedded into the output file.
-
Closed caption data on upper tracks will be prioritized in export.
1) Select an exporter in the category tree of the [Print to File] dialog box.
2) Select the export method from the list on the left of [Captions].
|
[None] |
A file will be exported with the closed caption data removed. |
|
[Sidecar File] |
A normal file and sidecar file (closed caption file) are exported separately. Select the export method of the closed caption file from the list on the right.
|
|
[Burn into Video] |
A file will be exported with the closed caption displayed on the screen. In the exported file, closed caption will always be displayed.
|
|
[Embed in File] |
Closed caption data is embedded in the output file and output as a single file.
|
3) Click [Export].
4) Set the export contents, and click [Save] or [OK].
-
The export contents differ depending on the selected exporter. See the explanation for the respective exporter.
|
|
|---|
|
Exporting Closed Caption File Alone
You can export the closed caption of a project alone to a file.
1) Click [Captions] in the category tree of the [Print to File] dialog box.
2) Select an exporter, and click [Export].
3) Set a file name and saving destination, and click [Save].
Using Exporter by Target
You can easily export files using exporters for formats that are suitable for SNS or other upload destinations.
1) Click [Target] in the category tree of the [Print to File] dialog box.
2) Select an exporter, and click [Export].
3) After setting the export details, specify a file name and save destination and click [Save].