Placing Clips
Placing Clips
You can place source clips on the timeline.
Clip operations at placement and placement results are dependent on the editing mode.
1) Set the source channel mapping.
2) Move the timeline cursor to the position to place the clip.
3) Right-click a clip in the bin, and click [Add to Timeline].
-
The clip is placed on the track with the position of the timeline cursor set as the In point.
 Alternative
-
Drag and drop a clip in the bin onto the timeline. Channels can be mapped to any desired track and clips can be placed according to the drop point regardless of the track patch setting.

-
Play back a clip on the Player, and drag and drop the clip onto the timeline from the Player. Channels can be mapped to any desired track according to the drop point regardless of source channel mapping.
-
Play back a clip on the Player, and click [Insert to Timeline] or [Overwrite to Timeline].
-
Placing a clip displayed on the Player on the timeline: [E]
-
Set the source channel mapping, move the timeline cursor to the clip place point, and drag and drop the clip onto the Recorder.
-
Placing clips: [Shift] + [Enter]

-
You can place sources on the timeline without registering them to the bin.
Move the timeline cursor to the clip place point, right-click a track, and click [Add Clip]. Select the source from the [Open] dialog box, and click [Open].
Placed Clips
You can confirm that a filter or transition is set from the display of the clip placed on the track.
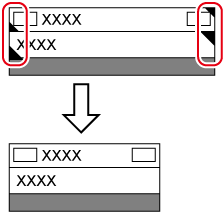
Triangular marks at both ends of the clip mean the start and end of the clip. Triangular marks are displayed when the clip has no margin.

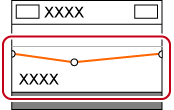
A green line is displayed at the top of the clip when rendering has been performed. An orange line is displayed when filter, time effect, layouter, normalize, etc. has been set.
When effect has been set

A frame is displayed as follows when a transition or audio cross fades is set between clips.

A triangle is displayed as shown below in the mixer area when a track transition is set at the start point of a clip.

Clicking the audio expand button displays a rubber band and waveform for the volume, and clicking the mixer expand button displays a rubber band for the transparency.

Adjusting the Volume and Pan of a Clip
Setting In/Out Points and Placing Clips
You can set In and Out points to clips, and place only the required part on a track.
1) Right-click a clip in the bin, and click [Show in Player].
-
The same operations can also be performed in the source browser.
2) Set the In and Out points to the clip.
3) Set the source channel mapping.
4) Move the timeline cursor to the position to place the clip.
5) Click [Insert to Timeline] on the Player.

-
The clip is placed on the track with the position of the timeline cursor set as the In point.
-
When [Overwrite to Timeline] is clicked, the clip is placed in the overwrite mode.
 Alternative
-
After setting the In and Out points to the clip, drag and drop the clip from the Player to place it on the timeline.
-
Placing the clip displayed on the Player on the timeline: [E]

-
Divided and placed video and audio clips are set in groups.
Placing Clips between In and Out Points on the Timeline (3 Point Editing)
Place clips between In and Out points on the timeline. Clips are placed by the length between In and Out points on the timeline.

1) Right-click a clip in the bin, and click [Show in Player].
-
The same operations can also be performed in the source browser.
-
Check the video on the Player, and set the In and Out points, if necessary.
2) Set the source channel mapping.
3) Set the In and Out points to the timeline.
4) Click [Insert to Timeline] on the Player.

-
The clip is placed trimmed to the length between In and Out points on the timeline. When the In point has been set, it is placed referenced to the In point.
-
The playback speed of the placed clip remains unchanged.
-
When [Overwrite to Timeline] is clicked, the clip is placed in the overwrite mode.
Placing the In and Out Points of Clips between In and Out Points on the Timeline (4 Point Editing)
Set the In and Out points to the clip, and place it between In and Out points on the timeline. The speed between In and Out points of the clip is adjusted automatically according to the length between In and Out points on the timeline.

1) Right-click a clip in the bin, and click [Show in Player].
-
The same operations can also be performed in the source browser.
2) Set the In and Out points to the clip.
|
|
|---|
|
3) Setting the Source Channel Mapping
4) Setting the In and Out Points to the Timeline
5) Click [Insert to Timeline] on the Player.

-
The In and Out points of a clip are placed between In and Out points on the timeline.
-
When [Overwrite to Timeline] is clicked, the clip is placed in the overwrite mode.
|
|
|---|
|
Placing Special Clips on the Timeline
You can create color bar clips, color matte clips, and title clips on the timeline.
-
For more information on how to create an adjustment clip, see Applying Effect to Multiple Clips in a Batch .
1) Click [Create Title] on the timeline.

2) Click the clip to create.
-
When the In and Out points have not been set on the timeline, the clip is created at the position of the timeline cursor. The duration of the created clip can be set by [Source] in [User Settings] → [Duration].
-
When the In and Out points have been set on the timeline, the clip is created between In and Out points. You can set whether to create clips between In and Out points or at the cursor position by [Source] in [User Settings] → [Duration].
|
|
|---|
|
3) Edit the clip.
 Alternative
-
Right-click the track to create the clip on, and click [New Clip] → clip to create. The clip is placed at the right-clicked track regardless of the channel mapping settings.

-
Color matte bars, color mattes and title clips placed on the timeline can be edited by the following operation.
-
Select the clip to edit, and click [Clip] on the menu bar → [Edit].
-
Double-click the clip to edit.
-
Editing selected clip: [Shift] + [Ctrl] + [E]
-
Editing Color Bar Clips
1) In the [Color Bars] dialog box, set [Color Bar Type] and [Tone].
2) Click [OK].
Editing Color Matte Clips
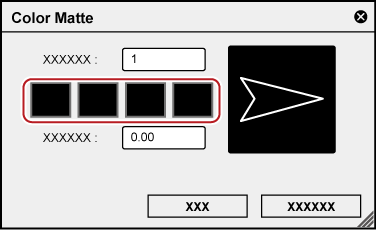
1) In the [Color Matte] dialog box, click the color palette.
-
Set the color palette starting from the left.

-
The [Color Select] dialog box appears.
2) Set the color.
3) Click [OK].
-
The screen returns to the [Color Matte] dialog box. To set a gradation, enter a numerical value of 2 or higher at [Colors] in the [Color Matte] dialog box, and repeat steps 1) to 3) .
4) Set the direction of the gradation, and click [OK].
-
The gradation can be specified by, for example, entering the numerical value in degrees, rotating the mouse wheel or dragging the mouse.
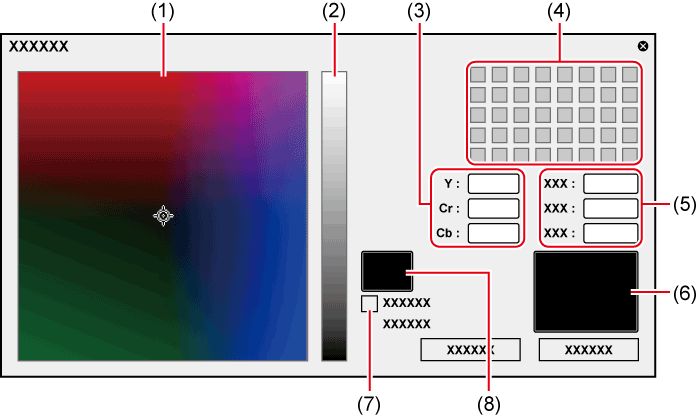
[Color Select] Dialog Box

|
(1) |
Color spectrum |
Drag the cursor to set the color difference (Cr, Cb). |
|
(2) |
Luminance slider |
Drag the slider to set the luminance (Y). |
|
(3) |
YCrCb value input field |
Enter numerical values for brightness and color difference to set the color. |
|
(4) |
Color palette |
Select a color from the standard color palette. |
|
(5) |
RGB value input field |
Enter numerical values for red (R), green (G) and blue (B) to set the color. |
|
(6) |
Color picker |
Select a color from video displayed on the Player/Recorder. Click the color picker, and click the desired color in the video currently displayed on the Player/Recorder. |
|
(7) |
[IRE Warning] |
Check this item to display the color spectrum and luminance slider in the limited range of 0 to 100 IRE. The IRE value for the selected color is displayed under this checkbox. |
|
(8) |
Preview box |
Display the preset color. |
