Converting Files
You can convert file formats of assets/clips to save them as new files.
This section explains how to convert an asset file.

-
Standard conversion presets are registered by default. You can also register and use conversion presets with custom configurations of your preference.
-
Assets/clips that can be converted are as follows:
-
Video (including sequence clips and timeline sequence clips)
-
1) Right-click on the asset in the thumbnail pane, and click [Transcode].
-
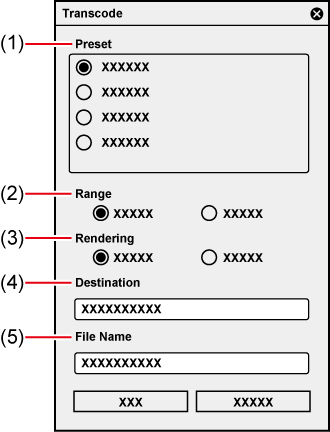
The [Transcode] dialog box appears.
-
To convert multiple files in the same conditions at one time, select multiple assets and right-click on them, and then click [Transcode].
2) Set each item, and click [OK].
-
The rendering job will be registered to the Render Service.
-
Registered rendering jobs are processed in the background in a sequential order of the predetermined priority. The progress of the rendering process can be checked on GV Job Monitor.
-
The converted files are saved in the destination specified in the [Transcode] dialog box and named as specified. If multiple assets are converted at one time, the converted assets are saved with the same names as the original assets.
-
The [Transcode] tag is added to the converted files, which are registered to [Library].
[Transcode] Dialog Box

|
(1) |
[Preset] |
Select a conversion preset to use. |
|
(2) |
[Range] |
Select the range of an asset to be converted. |
|
(3) |
[Rendering] |
Select which is used for rendering, the PC currently in use or an external render engine.
|
|
(4) |
[Destination] |
Enter the destination to save the converted file. |
|
(5) |
[File Name] |
Enter the name of the converted file.
|
Registering Conversion Presets
You can register and use conversion presets with custom configurations of your preference.
Conversion presets use exporter presets that have been exported from EDIUS. The registered conversion presets can be selected in the [Transcode] dialog box.
This section explains how to register an exporter preset.

-
You need to prepare for an exporter preset to be registered in advance.
For more information on how to export an exporter preset from EDIUS, see the manual of EDIUS.
1) Click [Settings] on the menu bar, and click [Import/Transcode].
-
The [Import/Transcode] dialog box appears.
2) Click [+Select] in [Transcode Presets].
-
The [Open] dialog box appears.
3) Select an exporter preset to register, and click [Open].
-
The description of the selected exporter preset is displayed on the right of [+Select].
-
The preset name and extension are displayed automatically. You can edit the preset name and extension.
4) Enter a preset name and extension, and click [Add].
-
The newly created conversion preset is displayed in the [Transcode Presets] list.

-
You can deregister a registered conversion preset by clicking [Delete] for the preset in the [Transcode Presets] list.