Main Dialog Screen
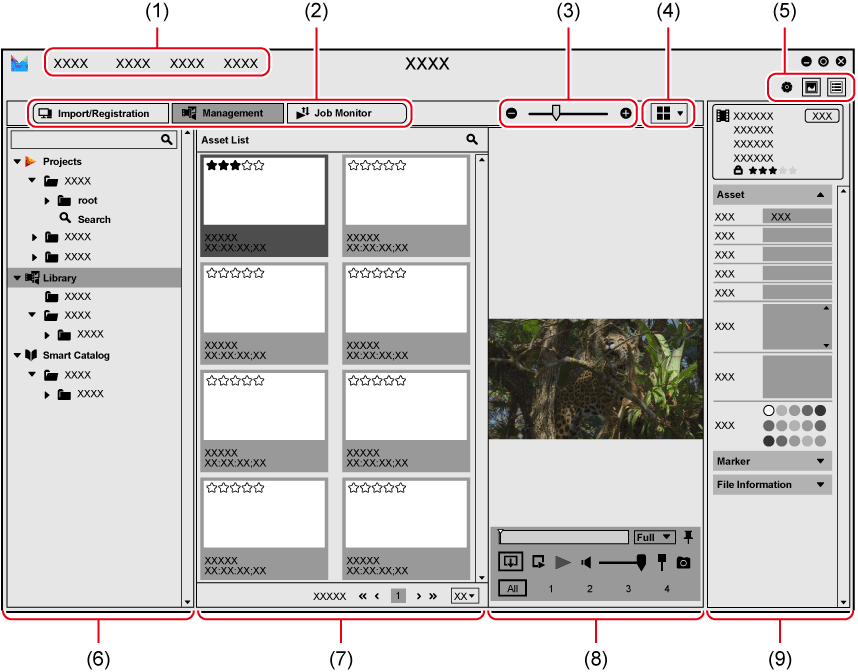
This section explains the screen configuration of the main dialog screen. The following screen is an example of display on the [Management] tab.
|
(1) |
Menu bar |
Perform various operations. |
|
(2) |
Switching tab |
Switch the display of the sidebar, thumbnail pane, and preview pane, depending on the purpose. |
|
(3) |
Zoom in/zoom out |
Drag the slider to the left and right to set the size of the thumbnail. ([Thumbnail] view only) |
|
(4) |
Display |
Switch the display of the thumbnail pane to thumbnail view.
Switch the display of the thumbnail pane to detailed view. Clicking the column setting button will set items to be displayed.
|
|
(5) |
Tool bar |
Change the window layout and open the [Settings] dialog box. |
|
(6) |
Sidebar |
The display contents differ depending on the tab selected by the switching tab.
|
|
(7) |
Thumbnail pane |
Display a list of sources in a device or folder selected on the sidebar, assets managed in the library, etc.
|
|
(8) |
Preview pane |
Click [View] on the menu bar, and click [Preview] to display. Preview area The preview of a source or asset/clip selected in the thumbnail pane is displayed. Operation area You can perform operations such as playback/stop, volume adjustment, and audio channel selection in the operation area. To select an audio channel, click the audio expand button in the operation area to expand the operation area. Click on an audio channel displayed in the expanded area to select it. |
|
(9) |
Properties pane |
The properties of a source or asset/clip selected in the thumbnail pane are displayed. |
 : [Thumbnail]
 : [Details]
Menu Bar
|
[File] |
[Exit] |
Exit Mync. |
|
|
[View] |
[Sort] |
Sort the items in the thumbnail pane in the specified order. |
|
|
[Overlay] |
[Zebra] |
Switch the show/hide setting for the zebra. |
|
|
[Audio level meter] |
Switch the show/hide setting for the audio level meter. |
||
|
[Closed Caption] |
[Display] Switch the show/hide setting for closed caption. When the menu item [Display] is checked, closed caption is displayed. [Settings] In the [Preview] dialog box, set the type and standard of the closed caption to display. |
||
|
[Preview] |
Switch the show/hide setting for the preview pane. |
||
|
[Properties] |
Switch the show/hide setting for the properties pane. |
||
|
[Settings] |
Open the [Settings] dialog box. |
||
|
[Help] |
[Help] |
Display the online manual. Online environment is required. |
|
|
[FAQ (Frequently Asked Questions)] |
Display frequently asked questions and answers. Online environment is required. |
||
|
[MYNCWORLD] |
Display MYNCWORLD.COM. Online environment is required. |
||
|
[News] |
Display [Information Board]. Online environment is required. |
||
|
[My Page] |
Log in to eID Web and access [My page top]. Online environment is required. |
||
|
[eID registration] |
Change the eID or delete the registration of eID. Online environment is required. |
||
|
[Serial number registration] |
Register the serial numbers of Grass Valley products. Online environment is required. |
||
|
[Database Migration] |
Take over assets, catalogs, and other data from an older version of Mync. |
||
|
[About] |
Display the version information. |
||
Tool Bar
You can switch the screen display or easily display the [Settings] dialog box using the tool bar.
 |
[Settings] Open the [Settings] dialog box. |
 |
[Preview] Switch the show/hide setting of the preview pane. |
 |
[Properties] Switch the show/hide setting of the properties pane. |
Switching Tab
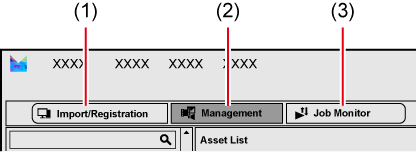
You can switch the display of the sidebar, thumbnail pane, and preview pane.
|
(1) |
[Import/Registration] tab |
Use this tab to import sources or register them to the library. |
|
(2) |
[Management] tab |
Use this tab to manage the library or preview assets. |
|
(3) |
[Job Monitor] tab |
Use this tab to monitor a rendering job. |
Sidebar
You can switch the display of the thumbnail pane.
-
The explanation of this section is based on the state when the [Import/Registration] or [Management] tab is selected with the switching tab. When the [Job Monitor] tab is selected, GV Job Monitor appears on the sidebar.
Sidebar for the [Import/Registration] Tab
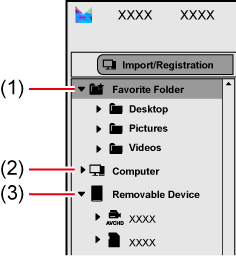
The folders of PC or devices connected to the PC (such as smartphone, USB memory, SD memory card used for camera) are displayed in a tree structure.
When you select a folder or device, the sources stored are displayed in the thumbnail pane.
|
(1) |
[Favorite Folder] |
Register a folder that is frequently used as import destination of sources. |
|
(2) |
[Computer] |
Expand the tree to display the folder tree of the file system. |
|
(3) |
[Removable Device] |
Expand the tree to display devices connected to the PC, such as camera, USB memory, or DVD. |

-
When some items on the sidebar are clicked,
 may appear on the right edge. If it happens, right-click on the item or click
to display the menu that can be used for the item.
may appear on the right edge. If it happens, right-click on the item or click
to display the menu that can be used for the item.
-
To update the information of the referenced folder or device, right-click on an item on the sidebar, and click [Refresh].
-
To open the selected folder with the explorer, right-click on a folder on the sidebar, and then click [Open in Explorer].
Sidebar for the [Management] Tab
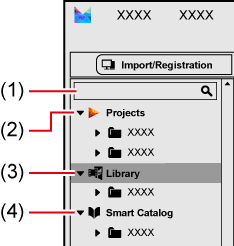
The following items are displayed in a tree structure: [Projects] which manages projects and clips of EDIUS on a project basis, [Library] which manages assets collectively, and [Smart Catalog] which automatically collects assets that match the specified conditions from the library.
Catalogs that the user has created are displayed on a lower layer of [Library]. You can drag and drop any desired assets from the library to collect them in a catalog.
When you select [Library] or catalog/smart catalog, the registered assets are displayed in the thumbnail pane.
|
(1) |
Project search bar |
Enter name of a project to search for. |
|
(2) |
[Projects] |
Click [Projects] to display a list of projects in the thumbnail pane. Expand the [Projects] tree to display projects created with EDIUS in a tree structure. If you expand the tree of a project and select a folder of the bin, the registered clips are displayed in the thumbnail pane.
|
|
(3) |
[Library] |
Click [Library] to display all the assets registered to Mync in the thumbnail pane. Expand the [Library] tree to display catalogs that the user has created. If you select a catalog, the registered assets are displayed in the thumbnail pane. When you register a clip to the bin with EDIUS, or when you convert a file with Mync, an asset is automatically registered to [Library]. After an asset has been registered, a red circle is displayed on the right of [Library]. |
|
(4) |
[Smart Catalog] |
Expand the [Smart Catalog] tree to display smart catalogs that the user has created. If you select a smart catalog, the registered assets are displayed in the thumbnail pane. Grouping Assets That Meet the Search Conditions (Smart Catalog) |
Thumbnail Pane
Projects, sources, or assets/clips are displayed according to the selected item on the sidebar.
By right-clicking on an item such as asset displayed in the thumbnail pane, you can use the following functions.
-
The explanation of this section is based on the state when the [Import/Registration] or [Management] tab is selected with the switching tab. When the [Job Monitor] tab is selected, GV Job Monitor is displayed in the thumbnail pane.
|
[Register to library] |
Register a selected source to the library.
|
|
[Import and register to library] |
Import a selected source and register it to the library at the same time.
|
|
[Open with EDIUS] |
Open an EDIUS project with EDIUS.
|
|
[Edit with EDIUS] |
Create an EDIUS project in accordance with the file format of an asset.
|
|
[Preview] |
Preview a source or asset/clip in the full screen view. You can also preview a source or asset/clip by double-clicking it in the thumbnail pane or double-clicking the preview area. |
|
[Open in Explorer] |
Use the explorer to open the folder in which the project and sources are managed. When an asset/clip is selected, the folder in which the referenced asset is managed opens. |
|
[Copy to Folder] |
Copy sources to which the selected asset/clip is linked to a desired folder. |
|
[Upload] |
Upload a source or asset/clip to YouTube, FTP server, or Amazon S3 *1 . Still images cannot be uploaded to YouTube.
|
|
[Send to EDIUS Bin] *2 |
Add assets/clips to the bin of an EDIUS project. |
|
[Show in Player] *2 |
Display assets/clips on the Player of EDIUS. |
|
[Transcode] |
Convert the file format of an asset/clip. |
|
[Remove from Bin] |
Delete registered clips from the bin of EDIUS. |
|
[Remove from the catalog] |
Deregister selected assets from the catalog. |
|
[Remove from library] |
Deregister a project or asset. |
*1 An optional license is required to use Amazon S3.
*2 Displayed only when EDIUS is running.
-
Operations that can be performed differ depending on the subject selected in the thumbnail pane, such as asset or clip.
-
For some functions, multiple items (assets, for example) can be selected and operated in a batch. Examples for operations of asset are given below.
Multiple assets can be selected as follows.
-
Click on an asset one by one while holding down [Ctrl] on the keyboard.
-
Click on the assets on the top and the bottom to specify the range you want to select, while holding down [Shift] on the keyboard.
-
-
Depending on the conditions of an asset, a square mark may be displayed at the lower right of a thumbnail. ([Thumbnail] view only)
The asset conditions by colors are as follows:
-
Green: Assets with markers
-
Blue: Asset with comments
-
Preview Pane
You can display the preview of a selected source or asset/clip and perform operations such as playback/stop, volume adjustment, and audio channel selection.
Also, you can add In and Out points or markers to a video asset.
By double-clicking on a source or asset/clip in the thumbnail pane, or double-clicking the preview area, you can switch the view to the full screen preview.
Operations in the Preview Pane
-
The show/hide setting for the preview pane can be switched by the following operations.
-
Click [View] on the menu bar, and click [Preview].
-
Click [Preview] on the tool bar.
-
-
Clicking [Pin] in the preview pane switches whether or not to always display the operation area of the preview pane.
Turn the [Pin] icon vertical to always display the operation area regardless of the mouse cursor position.
Turn the [Pin] icon horizontal to display the operation area only when the mouse cursor is moved onto the preview pane.
Properties Pane
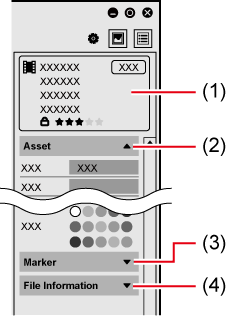
Various information of an item such as asset selected in the thumbnail pane are displayed. You can enter tags or comments to assets and projects, or change the display color.
Also, you can change the color of the marker added to a video asset or add comments to a video asset.
-
The show/hide setting for the properties pane can be switched by the following operations.
-
Click [View] on the menu bar, and click [Properties].
-
Click [Properties] on the tool bar.
-
|
(1) |
Information display area |
Display the type and name of the subject such as asset. For assets and projects, rating can be set by clicking on the star mark and changing the number of stars. A maximum of 5 stars can be set, which can be utilized in refined search. |
|
(2) |
[Asset] *1 |
Edit the name, display color, or other properties of an asset/project. Tags or comments can also be added. |
|
(3) |
[Marker] |
Display the information including timecodes of In/Out points and markers which have been added to an asset. You can change the color of a marker or enter comments. |
|
(4) |
[File Information] |
Display detailed information of the subject such as asset. |
*1 Displayed when an asset is selected in the thumbnail pane.
-
Details displayed in the properties pane differ depending on the subject selected in the thumbnail pane, such as asset or clip.
-
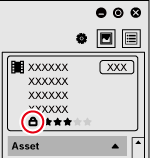
To edit content of the properties pane, click [Edit Properties] to unlock the properties pane.
-
Projects support the edit of the properties pane.
-
For sources and clips, contents of the properties pane cannot be edited.
[Settings] Dialog Box
You can configure various settings on the [Settings] dialog box.
-
To display the [Settings] dialog box, perform the following.
-
Click [Settings] on the menu bar, and click on the item to set.
-
Click [Settings] on the tool bar.
-
-
To exit the [Settings] dialog box, click [×] in the top right.
|
[General] |
[Language] |
Set the display language. |
|
[Theme] |
Change the user interface color. |
|
|
[Feedback] |
Check [Automatically send diagnostic and usage data to Grass Valley] to automatically send the data of diagnosis result and usage conditions of Mync to Grass Valley. The sent data is used for the purposes of improving the quality, reliability, and performance of the software. If the dialog box for the user account control has appeared after clicking the checkbox, click [Yes] to continue the operation. |
|
|
[View] |
[Timecode] |
Set the TC mode to be used when an asset/clip does not have a timecode. |
|
[Sidebar] |
Check [Show EDIUS projects] to display EDIUS projects on the sidebar. Also, the number of projects to be displayed can be set by [The number of projects to display in the sidebar]. |
|
|
[Preview] |
[Zebra] |
Set show/hide of zebra. You can set the upper/lower limit of the brightness level to detect, or select the color of the striped pattern to be displayed when the upper/lower limit is exceeded. |
|
[On Screen Display] |
Set show/hide of audio level meter in the preview pane. You can also set the font size and display position of audio level meter. |
|
|
[Closed Caption] |
Set show/hide of closed caption. The type and standard of the closed caption to display can also be set. |
|
|
[Full Screen Preview] |
This item is displayed only in the multiple monitor environment. Select the monitor to display a full screen preview. |
|
|
[Import/Transcode] |
[Snapshot] |
Set the file format, quality, etc. of the still images exported from video. In [Destination], set the saving destination of exported still image files. |
|
[Default Transcoding Destination] |
Set the destination to save converted assets/clips. |
|
|
[Import Settings Pane] |
Check [Hide] if you want to hide the import settings pane when the [Import/Registration] tab is clicked. |
|
|
[Transcode Presets] |
Register the preset for file conversion. Import an export preset file which has been exported from EDIUS and register it as a preset. |
|
|
[Share] |
[Share] |
Add/delete the account of YouTube, FTP server, or Amazon S3 *1 . |
|
[Performance] |
[Hardware decode] |
[H.264, H.265]/[Video RAW (Canon, Sony)] Decoding of H.264, H.265, and video RAW files can be made quicker using hardware. [GPU Mode (RED)] Set whether GPU is used to accelerate decoding of RED sources.
|
*1 An optional license is required to use Amazon S3.